OAuth2 with Spring — Part 3: Authorizing OIDC client with authorization_code grant from Spring Authorization Server
In our previous article we discussed about OAuth2 Authorization server configuration with client_credential. In this article we will discuss about authorization server configuration with authorization_code grant type. This authorization flow will have an OIDC client, which will get the JWT token by requesting with authorization code.
Social login is very popular these days and it is standardized by OAuth2 and OIDC specifications. Our today’s topic of discussion is setting up our social login client (oidc-client) application, registering it to the spring boot authorization server, login with authorization server and accessing secured resources from OIDC client application.
Today’s demo will contain 2 applications:
- Authorization Server (on port 8080)
- Social Login Client (on port 8081)
Since this is a complex topic, let’s see the application authentication and authorization flow in the UI first, and then we will discuss on the configurations.
To continue the journey with this article, get the project source code from here. Start the Authorization Server Application first, and then the Social login client application on your favorite IDE.
Our Social Login client has 2 endpoints:
- “/” will give us the access to public data
- “/private-data” will give us the JWT token
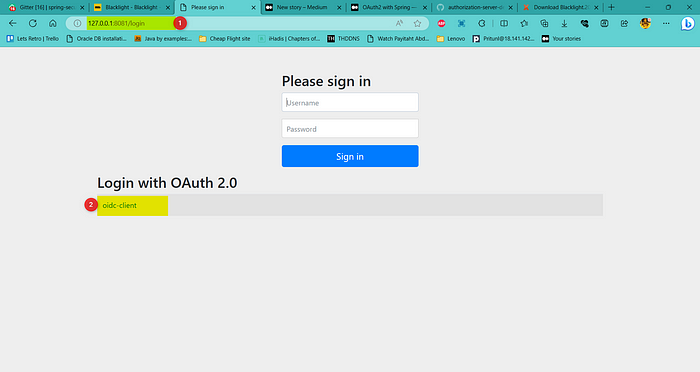
On the browser, navigate to “http://127.0.0.1:8081/private-data” . This will take us to the login page of client application.

Since we are interested in social login, instead of putting your username and password in this login page, click on oidc-client. It will take you to the login page of Authorization Server.
Provide “user” as the username and “secret” as the password in the below screen and click on Sing in.

This will take you to the consent page. Notice this URL of the consent page:
From the above URL, we can find several information:
- response_type=code
- client_id=oidc-client
- scope = openid, profile, read, write
- redirect_uri=http://127.0.0.1:8081/login/oauth2/code/oidc-client

Now, from the above page, provide the consents you want to allow the client application.
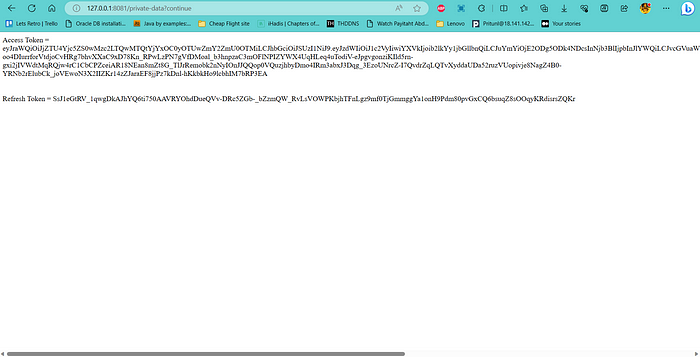
If the initially requested URL (/private-data) has the correct consent that you just provided, it will give us the access token and refresh token, otherwise it will display a 403-error page.

Now let’s dig deep into the code.
Authorization Server Configuration
In this application all the things are done in the application.yml file. Nothing much in the Java side, except the main class.
spring:
  security:
    user:

      # Definition of the user details that we will use for login
      # in the authorization server

      name: user
      password: "{noop}secret"
      roles: USER

    # Oauth2 client registration starts from here

    oauth2:
      authorization-server:
        client:

          # We have defined only one client: oidc-client
          # This client information was also mentioned
          # in the above URL: client_id=oidc-client

          oidc-client:
            registration:

              # The following client ID and client secret will be matched with the
              # provided client credentials from client application

              client-id: oidc-client
              client-secret: "{noop}secret2"

              # The following authorization-grant-type will be matched with the
              # provided authorization-grant-type from the client application

              authorization-grant-types:
                - "authorization_code"
                - "refresh_token"
              client-authentication-methods:
                - client_secret_basic

              # This following redirect URI will be used to redirect the resource owner to the
              # Client application after the resource owner (user) provides necessary consents.

              redirect-uris:
                - http://127.0.0.1:8081/login/oauth2/code/oidc-client
              post-logout-redirect-uris:
                - http://127.0.0.1:8081/logout

              # The scopes are defined in the authorization server.
              # These won't display in the consent page

              scopes:
                - "openid"
                - "profile"
                - "read"
                - "write"

            # Marking this flag as true will display the consent page

            require-authorization-consent: true

            # Here we set the access token and refresh token validity duration
            # in seconds

            token:
              access-token-time-to-live: 3600s
              refresh-token-time-to-live: 7200s
#        endpoint:
#          token-uri: "/oauth2/token"
#        issuer-uri: http://127.0.0.1:8080/issuer
logging:
  level:
    org:
      springframework:
        security: trace
Social Login Client
The client application has some java codes along with the application.yml configurations.
Application.yml
server:
  port: 8081

logging:
  level:
    org:
      springframework:
        security: TRACE

spring:
  security:
    oauth2:
      client:
        registration:

          # Client registration starts here
          oidc-client:

            # Our oidc-client needs a provider. The provider information has been registered
            # at the bottom of this configuration
            provider: spring

            # The following client-id and client-secred will be sent to the authorization server
            # for client_credentials authentication to the authorization server. We don't need to
            # mention the client_credentials in the grant type here. Note that, here the client-secret
            # must not have {noop} or any other encoding type mentioned.

            client-id: oidc-client
            client-secret: secret2

            # Our authorization grant type is authorization_code
            authorization-grant-type: authorization_code

            # The following redirect URL is the redirect URL definition of our client Server application.
            # It is generally the current application host address. The authorization server's redirect URL
            # definition means that this URL will be triggered when auth server redirects data to here.
            redirect-uri: "{baseUrl}/login/oauth2/code/{registrationId}"

            # Scopes that will be displayed for requesting in the consent page.
            # Authorization server must have equal or more scopes than these in number
            scope:
              - openid
              - profile
              - read
              - write
            client-authentication-method: client_secret_basic

            # This client name will display in the login screen as social login type
            client-name: oidc-client

        # As mentioned above about provider, here we register the provider details
        # for any unknown provider with their issuer URI
        provider:
          spring:
            issuer-uri: http://localhost:8080

      # Since our application acts as both authorization client and resource server,
      # here is the configuration for resource server
      resource-server:
        jwt:
          issuer-uri: http://localhost:8080
Controller:
package com.mainul35.socialloginclient;

import org.springframework.beans.factory.annotation.Autowired;
import org.springframework.http.ResponseEntity;
import org.springframework.web.bind.annotation.GetMapping;
import org.springframework.web.bind.annotation.RequestMapping;
import org.springframework.web.bind.annotation.RestController;

@RestController
@RequestMapping("/")
public class AppController {

    @Autowired
    private AppService appService;

    @GetMapping("/")
    public ResponseEntity<String> getPublicData() {
        return ResponseEntity.ok("Public data");
    }

    @GetMapping("/private-data")
    public ResponseEntity<String> getPrivateData() {
        return ResponseEntity.ok(appService.getJwtToken());
    }
}
Service:
Since in our Service method has @PreAuthorize(“hasAuthority(‘SCOPE_read’)”), so we will have to allow the “read” permission from the consent page to access this data, otherwise we will get 403 error page. You might be interested in how we are getting the refresh token here.
package com.mainul35.socialloginclient;

import org.springframework.beans.factory.annotation.Autowired;
import org.springframework.security.access.prepost.PreAuthorize;
import org.springframework.security.core.Authentication;
import org.springframework.security.core.context.SecurityContextHolder;
import org.springframework.security.oauth2.client.OAuth2AuthorizedClient;
import org.springframework.security.oauth2.client.OAuth2AuthorizedClientService;
import org.springframework.security.oauth2.client.authentication.OAuth2AuthenticationToken;
import org.springframework.security.oauth2.core.OAuth2AccessToken;
import org.springframework.security.oauth2.core.OAuth2RefreshToken;
import org.springframework.stereotype.Service;

@Service
public class AppService {

    @Autowired
    private OAuth2AuthorizedClientService authorizedClientService;
    @PreAuthorize("hasAuthority('SCOPE_profile')")
    public String getJwtToken() {
        var authentication = SecurityContextHolder.getContext().getAuthentication();
        var accessToken = getAccessToken(authentication);
        var refreshToken = getRefreshToken(authentication);
        return String.format("Access Token = %s <br><br><br> Refresh Token = %s",
                accessToken.getTokenValue(), refreshToken.getTokenValue());
    }

    public OAuth2AccessToken getAccessToken (Authentication authentication) {
        var authorizedClient = this.getAuthorizedClient(authentication);
        if (authorizedClient != null) {
            OAuth2AccessToken accessToken = authorizedClient.getAccessToken();
            if (accessToken != null) {
                return accessToken;
            }
        }
        return null;
    }
    public OAuth2RefreshToken getRefreshToken(Authentication authentication) {
        var authorizedClient = this.getAuthorizedClient(authentication);
        if (authorizedClient != null) {
            OAuth2RefreshToken refreshToken = authorizedClient.getRefreshToken();
            if (refreshToken != null) {
                return refreshToken;
            }
        }
        return null;
    }

    private OAuth2AuthorizedClient getAuthorizedClient(Authentication authentication) {
        if (authentication instanceof OAuth2AuthenticationToken) {
            OAuth2AuthenticationToken oauthToken = (OAuth2AuthenticationToken) authentication;
            String clientRegistrationId = oauthToken.getAuthorizedClientRegistrationId();
            String principalName = oauthToken.getName();
            return authorizedClientService
                    .loadAuthorizedClient(clientRegistrationId, principalName);
        }
        return null;
    }
}
SocialLoginClientApplication:
We must annotate our Main class with @EnableMethodSecurity to allow the method security in the application.
package com.mainul35.socialloginclient;

import org.springframework.boot.SpringApplication;
import org.springframework.boot.autoconfigure.SpringBootApplication;
import org.springframework.security.config.annotation.method.configuration.EnableMethodSecurity;

@EnableMethodSecurity
@SpringBootApplication
public class SocialLoginClientApplication {

 public static void main(String[] args) {
  SpringApplication.run(SocialLoginClientApplication.class, args);
 }

}
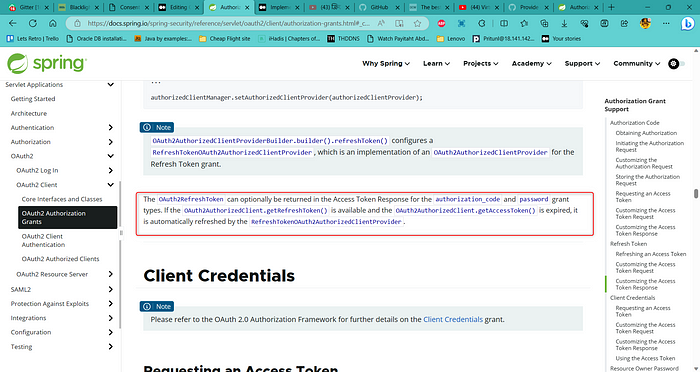
According to Spring Security documentation, for “authorization_code” grant, If the OAuth2AuthorizedClient.getRefreshToken() is available and the OAuth2AuthorizedClient.getAccessToken() is expired, it is automatically refreshed by the RefreshTokenOAuth2AuthorizedClientProvider.

Thank you for reading with patience. In our next article we will try to see how to use Google as our authorization server in our client application.
The complete code for this example can be found here.
